Accessing isolated network estate on AWS: Part 3 - ECS Fargate Host
Serverless bastion host based on Docker
We will continue where we left off in the previous post here, by talking about another, more advanced way to reach your private resources within your AWS network estate.
Do note that this approach does not require a host exposed in a public subnet which means the need for hardening, auditing and strict compliance measures that you would have to take with normal bastions does not apply as stringently to this method as it is significantly harder for bad actors to use it as a spring board to wreck chaos on your platform. This is the second post where we cover the methods that do not require exposed network connectivity which will greatly reduce the security exposure of your solution, especially if it has no web or API component. The first method not requiring any internet access for accessing the bastion can be found here:
Accessing isolated network estate on AWS: Part 2 - AWS Systems Manager Session Manager
In this post we will talk about creating a bastion host that can be used as a jump box but with an added twist, it is not reachable and has no access to the internet. We will be accessing it solely through the AWS Systems Manager Session Manager. Let’s get directly into the advantages:
Advantages
No servers to manage.
No EC2, no EBS, no instance profile, AMI, lifecycle resources to worry about and manage manually yourself. While it is not a true “serverless” concept, as you still have potentially long-running processes, this pushes the undifferentiated heavy lifting across the shared responsibility model into AWS’s court, releasing you from all of this operational burden.
Easier to compose the final image.
There are significantly more individuals that know how to write Dockerfile images than Packer, Chef or Ansible. While it is recommended for somebody with experience in creating hardened images, especially ones that are publicly available and configuring them well, this lowers the bar, allowing more hands to participate and quickly iterate.
This also reduces the complexity of building a golden image due to the simplified build process.
Reduces net total resource count to be managed.
Especially if you are using AWS CDK, there are L3 constructs that allow the creation of the entire resource stack with less than 50 lines of code.
Cost savings.
With AWS ECS Fargate, you only pay for the resources you use. Fargate allows you to specify the amount of CPU and memory required for your container, and you are only billed for the amount of resources that your container uses, rounded up to the nearest second.
This means that if you only need a bastion host for a short period, such as during an incident response, you can launch a Fargate task with a smaller instance size, and only pay for the exact amount of resources that you use.
Disadvantages
More configuration needed.
If we are comparing the basic resources and configuration items needed to get a EC2 running compared to a Fargate task, then the Fargate route is a much more involved and knowledge intensive process.
This difference is offset once we start discussing scalability with auto scaling, cost savings with Spot instances, load distribution with load balancers of course.
Note
When discussing this with colleagues it has been brought up that boot time is longer for the Fargate option which I see as being more nuanced as opposed to a clear cut disadvantage.
As with any architectural design, the presence of our dear friend ‘it depends’ is felt due to the variety of elements that can affect the total boot time that we need to take into account:
Fargate
Task definition size
The size of the task definition can impact boot time. Larger task definitions may take longer to load into memory, which can increase the time it takes for the task to start.
Container image size
The size of the container image can also impact boot time. Larger images take longer to download and extract, which can delay the start of the container.
Resource allocation
If your task requires a large amount of CPU or memory, it may take longer to provision the resources needed to start the task.
EC2
Instance type
The instance type you choose can impact boot time. Larger instances may take longer to provision and start up.
AMI size
The size of the AMI can also impact boot time. Larger AMIs may take longer to load into memory and start up.
Boot volume type
The type of boot volume you choose can also impact boot time. For example, an instance with an EBS-backed boot volume may take longer to start than an instance with an instance-store backed boot volume.
User data scripts
If you are running user data scripts on your instance, they can impact boot time. Long-running scripts or scripts that perform complex tasks can delay the instance startup.
Of particular note in the factors above is the juxtaposition of the resource allocation versus the instance type which, while both are configurable, if the requested instance type pool is exhausted, your server request is not getting processed. Whereas for Fargate, as long as you have not requested the higher end 8/16 vCPU, your request will be processed in a timely manner.
Example
Note
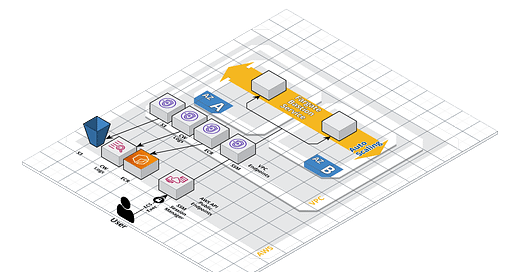
This is an optimized implementation that references an image from ECR and uses VPC Endpoints to completely lock down the bastion network and disallow any WAN access to avoid possibility of exfiltration of data.
While we are optimizing for simplicity here, there is still a lot of “supporting” implementation needed, to achieve the locked down environment in ECS Fargate is the focus of my other blog post:
Isolated network workloads in AWS: ECS Fargate
In a typical setup, compute nodes such as AWS Fargate tasks within an Amazon ECS cluster require internet access to pull container images, push logs, and other tasks. However, in certain scenarios, you might want to restrict internet access due to security or compliance requirements. This is where a Fargate ECS cluster …
Let’s now go through the code needed to launch a simple bastion host on AWS ECS Fargate using AWS CDK.
Do note that I will not be using the ‘@aws-cdk/aws-ecs-patterns’ QueueProcessingFargateService or ScheduledFargateTask L3 construct as I want to keep it as simple and straightforward as possible to digest.
Of course you should strive to leverage the full suite of tools offered by AWS for scalability and resiliency, but for our use case, conciseness is of greater value and I have mentioned the L3 construct above as a guidance towards what you should be looking for when trying to scale up this approach for your use case.
Step 1: Initialize the CDK App
First, we need to initialize a new CDK app in our preferred language, which for me is currently TypeScript. Let’s open up a terminal and run the following commands to get started:
> mkdir -p accessing-isolated-network/bastion-fargate

> cd accessing-isolated-network-access/bastion-fargate

> npx cdk init app --language=typescript
This will create a new CDK app in TypeScript with the following structure
Step 2: Define the VPC Stack
Next, we define the VPC stack where Fargate will place the container ENI.
Open up the lib folder and create a new file called vpc-stack.ts. Add the following code to create a new VPC with a private subnet and the required 6 VPC Endpoints:
ECR-API
ECR-Docker
S3
SSM
SSM-Messages
EC2-Messages
Logs
The ECR-API, ECR-Docker & S3 endpoints are needed for pulling the image, SSM, SSM-Messages and EC2-Messages are needed for remote accessing while Logs & S3 is needed to send audit data to target system.
Step 3: Define the Fargate Bastion Stack
Now create a file named fargate-stack.ts with the below snippets pertaining to the setup of ECS & ECS Exec of content. The full code can be found linked in the caption and at the end in GitHub. The explanation of the locked down ECS Fargate foundation setup is linked above in my other blog post.
Here we are defining the Fargate Service that will launch the container in the private subnets and will communicate only with the required AWS services via the VPC Endpoints.
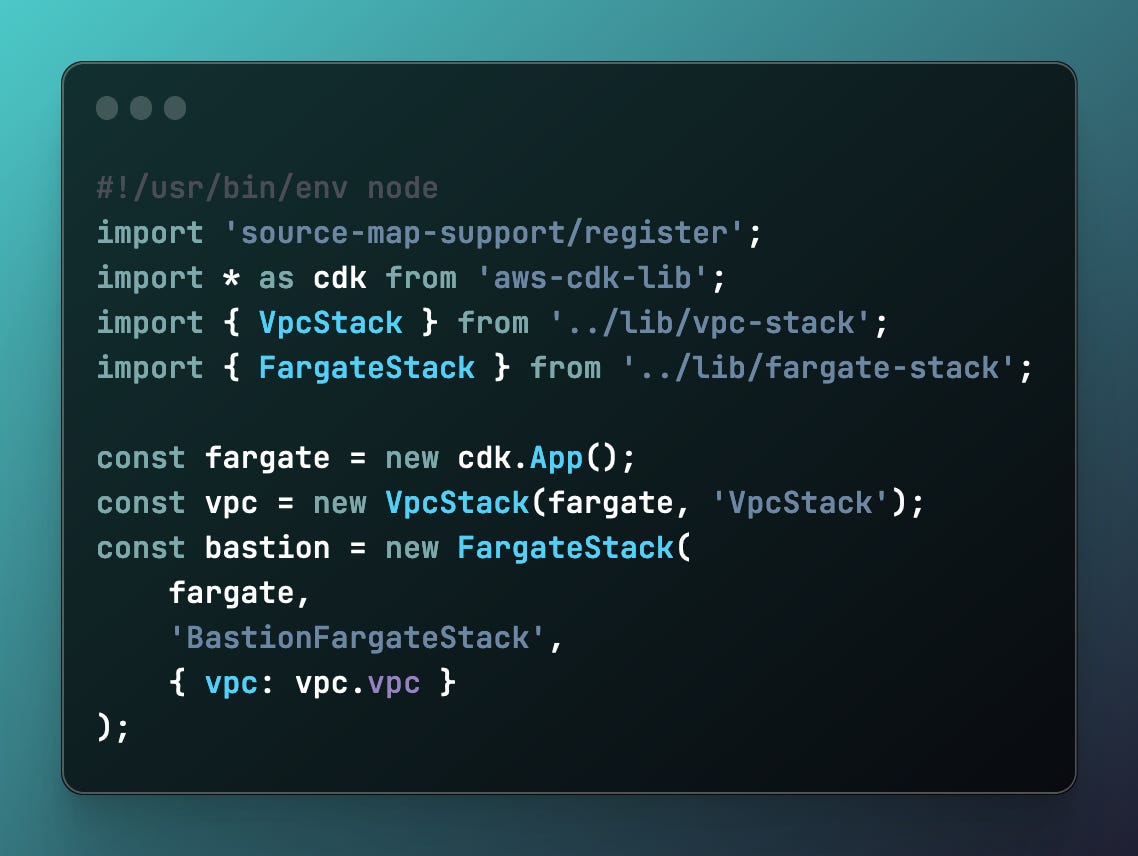
Step 4: Define the App Stack
Deploying this stack is done via the main of:
Step 5: Deploy app
> AWS_PROFILE=<profile> npx cdk deploy --allDo note that in-between the “VpcStack” and “BastionFargateStack” ideally you should also populate the ECR repository with the image from DockerHub as we do not have any WAN access to pull it from there.
As such you should run the following commands in the terminal
> export REGION=<region> && export ACCOUNT_ID=<account_id>

> docker pull amazonlinux:2023.0.20230607.0

> docker tag amazonlinux:2023.0.20230607.0  $ACCOUNT_ID.dkr.ecr.$REGION.amazonaws.com/bastion-fargate:latest

> aws ecr get-login-password --region $REGION | docker login --username AWS --password-stdin $ACCOUNT_ID.dkr.ecr.$REGION.amazonaws.com

> docker push $ACCOUNT_ID.dkr.ecr.$REGION.amazonaws.com/bastion-fargate:latest
After the ECR repository is populated with the "amazonlinux” image, we can proceed with the second stack deployment:
All commands in this terminal session will be recorded and logged in Cloudwatch as configured.
Any command you enter in the terminal will be logged to the target log group. You can send logs to CloudWatch and/or S3 for future data mining and monitoring.
This is a clean and simple way to ensure that any “break-glass” done that reaches into an application container or a bastion jump host is logged, audited and alarms can be triggered based on this data stream.
Step 6: Cleanup
Now that we have created all the needed resources and have gained access within the estate, time to delete all the resources to avoid accruing unwanted charges to our account:
> npx cdk destroy --allIn the following post I will cover a similar approach using AWS Client VPN which removes any running server requirement and links your local machine to the AWS private VPC network representing the smallest footprint and management overhead option.
Conclusion
The strategic implementation of a serverless bastion host, capable of dynamic scaling to optimize cost efficiency that leverages Spot instances to potentially reduce operational expenses by up to 70%, is an invaluable asset in our technological toolkit.
This solution, characterized by its definition in user-friendly Dockerfiles and its unique ability to maintain complete isolation from the internet while retaining global accessibility, represents a significant advancement in our infrastructure capabilities.
In conjunction with the AWS Client VPN, which will be the focus of my next post, these two solution offer a comprehensive approach to managing scenarios where ad-hoc access to components of applications running on AWS is required.
For a deeper understanding and practical application, I invite you to explore the complete codebase for the aforementioned example, available in my GitHub repository, linked here.


